With the CupCake printing successfully again, the next step was slicing so that I could print new things instead of only reprinting G-code that I’d saved in 2012.
As noted before, I hadn’t figured out how to get Skeinforge to run on a current computer, after losing my previous Skeinforge installation to the crashes of both my personal desktop and laptop computers, on which I had all of the data and none of the software or configurations backed up. (I’m wiser now.)
I struggled figuring out how to get Skeinforge running again now, in part because I think the instructions that come with it never got updated as its capabilities did. No, I am not going to copy the STL into the system executable directory every time I want to slice something and then move the resulting G-code back out. It turns out that any version of Skeinforge that I might actually want to run has a file browser and remembers where you browsed the last time you used it; so it’s pretty easy to get along with.
And as to which version I actually want to run, one of the files I did have backed up was my detailed notes on fine-tuning Skeinforge settings for my CupCake, which (naturally) included the fact that I was running Skeinforge 0035. So there we go.
With slicing working, that just leaves calibration, and I’ve done that now too.
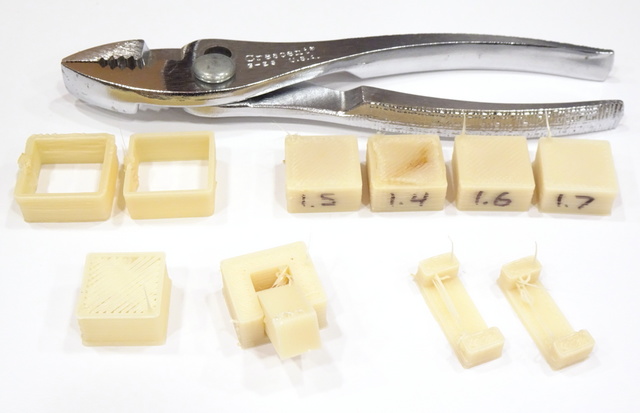
Last weekend … the weekend before? (Time flies / Doesn’t seem a minute) … I used my favorite calibration set, coasterman’s Essential Calibration set, to (re)calibrate Skeinforge to my CupCake.
The first thin-wall box (upper left) is printed with Skeinforge’s default settings, which aren’t even for a CupCake, and was extruding way too much plastic. The second is printed after clicking in all of MakerBot’s published CupCake defaults, and was good enough for me.
The 20-mm infill boxes test the Infill Solidity setting, which I always mix up and take in the wrong direction before going the right direction. 1.7 gives a beautiful, smooth upper surface to my infill.
Bridging (lower left) is … something I’m not going to try too hard to adjust right now. It works-ish. The perimeter-width calibration objects fit together on the first try. The Oozebane tuning to reduce stringing as the nozzle moves from one print area to another … does nothing for me, and never has.
And then I was ready to print, so print I did!
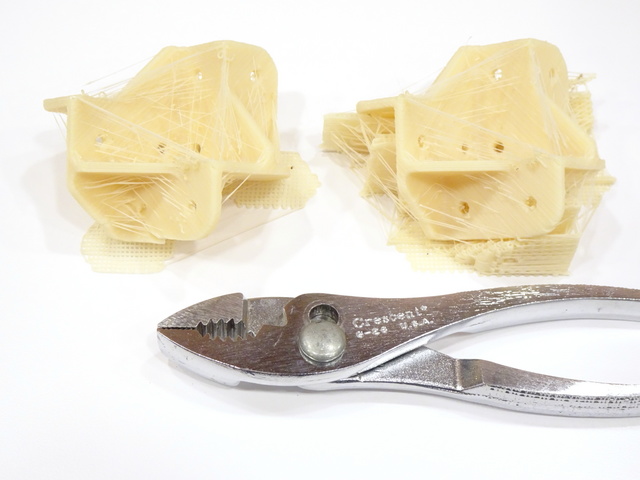
The first non-calibration object I printed was this bracket I designed for 2020 aluminum extrusion (left). It doesn’t look so great. Let me tell you what’s wrong with it: … No, let me take the shorter approach of telling you what’s right with it: The two-hour print completed with no hitches. That is one hideous print.
I reprinted it with the Comb module activated (right), so that when it needs to move the nozzle from one area to another, it takes a path over the printed area instead of over open space, completely eliminating stringing. From the print areas. Comb completely eliminates stringing from the print areas. But Comb is executed (in the current toolchain configuration) before Raft; and Raft is the module that generates the support material that I was trying out in Skeinforge for my first time evar; so you still get stringing to and from the support material (and not even optimized for the shortest hop across open air). That’s handy.
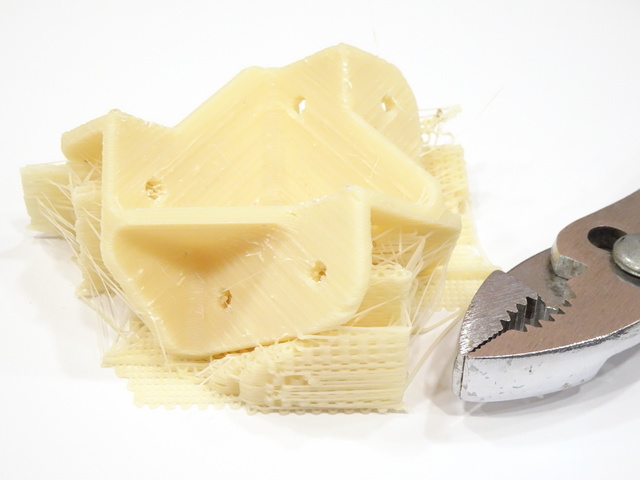
And that support structure (front right) is … not what we’re used to in 2020. It’s actually not too bad — it uses material pretty efficiently; it generally is only generated where needed; and it generally detaches pretty easily. But it looks very different.
Also you can see how blobby and irregular the print is. Because the CupCake is horrible and incapable of printing smoothly? What if this is the best I can ever get?? All this effort … !!! … !!!
But I didn’t believe that. I’ve made smooth prints before; what’s the difference? The difference is that this object requires hopping the nozzle from area to area a lot; and rapidly stopping and restarting extrusion during nozzle hops are what a DC gearmotor extruder is worst at. With a stepper extruder, this part would be glorious!
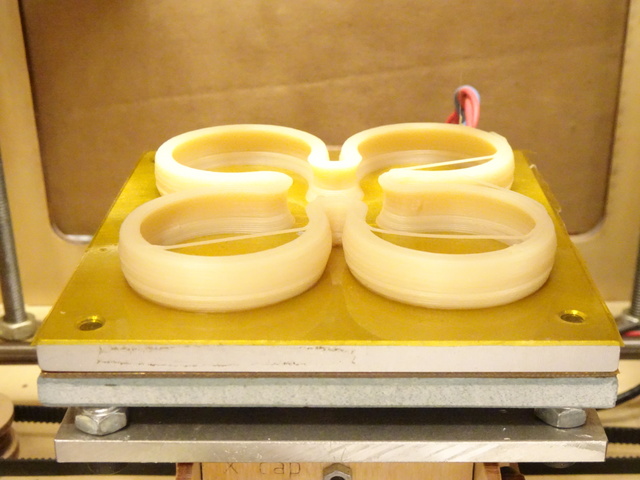
Prove it!, you say. Fine; I’ll CAD up a part in which each layer has all smooth curves and no jumps, and we’ll see how gloriously it comes out.
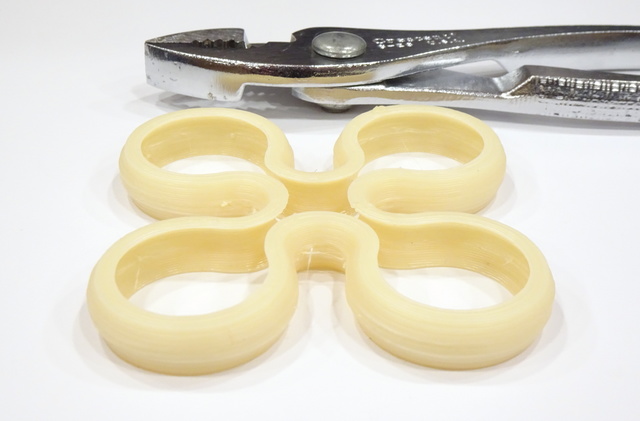
There you go. The strands on the top layer are where the Y axis snagged and skipped steps and everything went poo; but otherwise, that’s a smooth print, photographed with the camera handheld in order to cause enough blur that you can’t prove otherwise.
It does, however, have very noticeable shrinkage from about 2 mm ≤ Z ≤ 4 mm. That, my dear friends, corresponds to when I opened the door to the garage to go work on something while still listening to the printer in case of problems. The blast of cold air from the garage shrank the ABS immediately — and more on the front of the print than the back.
Here’s a reprint with the dimensions reduced slightly to avoid the previous snagging when the build platform is at the absolute extremes of its range of travel, and with the entire build chamber enclosed by cardboard and plexiglass. There’s still some irregular shrinkage that I’m going to have to figure out, and just a bit more stringing that wasn’t completely eliminated. But this is not too bad.
Wow you finally got there! I’ve had your blog bookmarked since buying my Cupcake CNC (one of the final “Cupcake Ultimate” kits that were sold at a discount after the Cupcake was replaced by the Replicator), and it’s great to see it continuing on after all indications were that it was abandoned in 2012.
I’m the opposite to you – having kept my Cupcake going ever since purchase as my only 3D printer, but never getting around to documenting any of my experiences or modifications properly at all. Certainly I’ve intended to write a web page about it for years, but there’s always something that I should do to it first.
Anyway here are some quick notes:
*I’m using the final Skeinforge release, 50, and it works well with my settings. I ended up with three sets of print settings named “appearance”, “accuracy”, and “solid”, chosen based on the requirements of the print. I also tinker with them, particularly raft, surface layers, and infill settings, a little bit for each print.
*Some General settings (more details available on request):
Extruder: 225degC
Bed: 120degC
Motor: 255 (full speed)
0.28mm layer height
*I looked into Slic3r once. I think at that point the printer “drivers” (for want of a better word) are integrated with the software, so you’d have to write the code to add another one for the Cupcake. I believe it’s possible to replace the firmware with one of the modern RepRap ones (“Sailfish” comes to mind, but I haven’t got time to check these details now), and then Slic3r can talk its language, but I don’t want to do that and I imagine you’d feel the same.
*I’m using ReplicatorG for control. I load in the gcode generated by the later Skeinforge release manualy. Skeinforge does need clean meshes, and some of the newer models on Thingiverse are tricky to get through it. I’m using Netfabb Basic (no longer available, no ideas what a good modern alternative is) and Meshlab for tidying up prints, as well as splitting them up to fit on the Cupcake’s build platform. It struggles a bit with really detailed meshes in any case.
*On the topic of really detailed meshes, as are now common on Thingiverse. I probably got the tip to print from the SD card from your original series of Cupcake posts, and many thanks for that, I do that along with Unpause enabled in Skeinforge. But still with some very curvy or otherwise complex prints, the Cupcake can stall for a moment. I don’t remember it actually ruining a print that way though, except where the print was just too ambitious overall and failed for a combination of reasons.
*I always get strings – they’re easy to clean, and it gives you something to do while the next part is printing.
*My computers don’t change much, so keeping the software working isn’t too much of an issue. Still this might possibly be handy for you:
https://github.com/dob71/x2swn
*I did install Printrun once, but never got around to trying to get it to work with the Cupcake.
*I’m using painter’s tape on the heated build platform (a solid block of aluminium, probably copying you again but I can’t remember anymore). It’s not perfect, but I was doing well with raftless printing for a while. These days I’ve gone chicken and usually use a raft just for one thing less (or at least less likely) to go wrong.
*I had the extruder stall problem too. I’ll put my original notes about it at the bottom, but in the end both of the motor drivers failed to turn it reliably so, seeing as my settings already had them at 255 all the time except when laying a raft, I built a replacement circuit using two relays. They may wear out fairly soon given the amount of switching that goes on, but it works well for now and current handling ability is certainly no longer a problem. Here’s a pic of the relay board, I’ve got a hand-drawn schematic that can be scanned in on request (or will be anyway when I get to writing that web page one of these decades), it’s pretty simple:
http://computernerdkev.heliohost.org/cupcake/img/extruder_relay_wiring.jpg
*The tape you see in that pic is for my enclosed build chamber, which is just plastic wrap taped on, as well as bubble wrap on the top attached in a way that the extruder can push it out of the way when it pokes through (though preventing it from sucking it up with the filament has been a little tricky). Again it’s not perfect.
*Over time the screws in the Y-carriage do loosen. For the last print I had to take it out and retighten/reinsert many of them because it had finally started falling apart.
*I haven’t had any problems with the stepper drivers, touch (ply)wood.
*Here’s my Thingiverse account if you want to look at a few of the things that I’ve done with my Cupcake:
https://www.thingiverse.com/cnk/designs
*Recently I’ve also been experimenting with casting my 3D prints in aluminium to make moulds:
http://computernerdkev.heliohost.org/pitrex/cartcase/LPmoulded/mouldcasting/topsand1.JPG
http://computernerdkev.heliohost.org/pitrex/cartcase/LPmoulded/mouldcasting/furnace2.JPG
http://computernerdkev.heliohost.org/pitrex/cartcase/LPmoulded/mouldcasting/casting2.JPG
http://computernerdkev.heliohost.org/pitrex/cartcase/LPmoulded/mouldcasting/casting3.JPG
http://computernerdkev.heliohost.org/pitrex/cartcase/LPmoulded/mouldcasting/topmould2.JPG
*Generally the first thing to do before a print is fix everything that broke during the last print, but overall I manage to get it to do everything I want.
*I printed a bearing retainer to prevent the bearing in the extruder from falling out. Though I think it still happened once after the screw holding it on wiggled loose.
Very glad to see you sharing your Cupcake adventures much better than I do. That was quite a lot even just for “quick notes”, and I left a few things out too, but don’t have time.
Here are the notes from my own extruder driver troubleshooting:
Printing Extruder Cut-Outs:
^^^^^^^^^^^^^^^^^^^^^^^^^^^^^^^^^^^^^^^^^^^^^^^^^^^^^^^^^^^^^
*Extruder controller can’t supply enough current to motor and cuts out. Probably happening now because
the extruder motor is getting old and drawing more current.
*loosening filament screw helps, but the extruder still cuts out when the PWM frequency is reduced due
to larger current surges. This happens when building the bottom layer of a part.
*Solution will be to use buffer transistors for outputs which will have to be in bridge configuration.
See the Datasheet for the PWM control IC and the board schematic.
-PWM problem only if flow rate set <1 in "speed" settings in Skeinforge.
-Feed rate?
-Actually does happen in normal printing as well.
–
*Tried to hook up power lines directly to motor controller chip in case of voltage dips causing problem
due to uCont getting confused. However got IC orientation wrong and hooked up GND to CP2, this killed
the chip when tested.
* Lifted DIR and ENABLE pins on 2nd, unused motor controller and ran signals for 1st controller to it
from the status LEDs.
*Tested with this configuration, motor works fine even with excessive load, indicating that the power
lines are further from the uCont. for this chip.
*Also observed that with normal settings, PWM is at maximum during printing. This means that the PWM
motor controllers could be replaced with bare transistors or relays without great detriment from the
loss of the special PWM features of the motor controller IC's extra circuitry.
*I Still am unsure why the fault with the 1st motor controller IC was so intermittent
UPDATE:
*Fault developed with second controller. Going to replace with two relays.
-Need to find all the details that I looked up last time.
-Saved in cupcake docs directory