I have this preowned carpet in good condition, see, but it’s in small and medium pieces. My brother has a carpet-seaming iron and plenty of tape. I’d like to use what I have on hand and get the bus livable, then make it perfect later with a beautiful carpet beautifully installed. (Fire bullets, then cannonballs.)
Let’s use the computer to help figure out how best to fit the scraps into the bus, shall we? If you’d like to play along at home, the drawing file is available for download at the end of this post. I’d love for someone to come up with a better plan than I have so far.
The Pieces
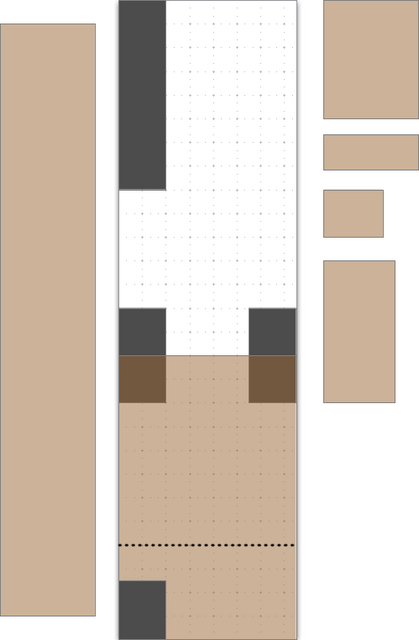
The gridded part of the drawing is the main floor area of the bus (omitting the area under the driver’s seat and forward of the front door), with the front of the bus at the top of the drawing. The dark rectangles are obstructions — kitchen cabinet in front and toilet riser in back (not to be carpeted) and wheel wells in the middle (requiring more than just laying carpet flat over them). The dotted line in back is where the bathroom wall will go. The carpet pieces are light brown, oriented in the direction of the nap, and translucent on the drawing so we can see how they overlap.
The large piece already set in the back of the bus is … already set in the back of the bus, cut to fit around the toilet, and slit to fit between and over the wheel wells. The dark brown areas in the upper corners are the translucent carpet piece overlapping the charcoal wheel wells.
This slide is the “kit” with which to start.
I expect to have bunks or desk filling most of the wall space in the main room (like the kitchen already does); so the center aisle will remain the primary walkway.
Plan 1: No seam in the walkway
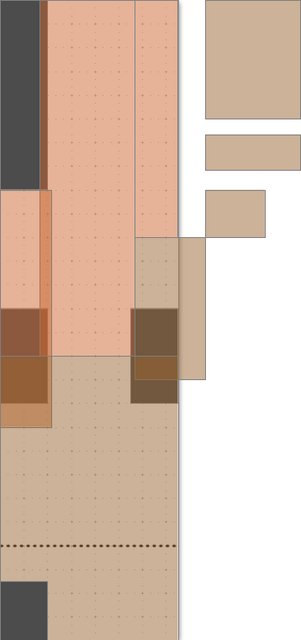
I (virtually) took the long strip from the left, laid it down the main aisle, cut it to length where it met the piece already set in the back, then sliced that cutoff down the middle and used the two pieces to fill the front passenger side and the middle driver side. I changed the color from light brown to eye-catching-ugly to designate it as a set of pieces that had been cut.
The thin, dark areas are where pieces overlap (translucent in the drawing, remember) and would be cut to fit.
This has the advantage of not having a seam getting walked on all the time. It has the disadvantage of requiring two seams the length of the entire forward area of the main room.
Plan 2: Cut it in half
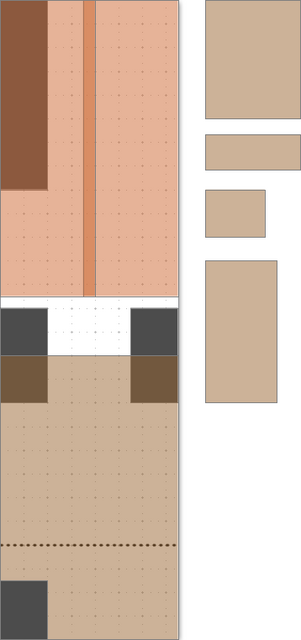
I cut the long piece in half lengthwise and seamed it together, which only requires one long seam. The design is symmetrical but in my opinion not particularly helpful. It requires several more seams (both horizontal and vertical) right at a high-traffic chokepoint between the wheel wells. And it has a seam right down the entire main aisle.
Plan 3: One extra piece
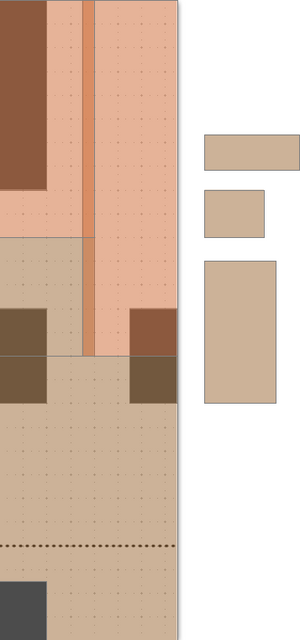
This still has a seam down the main aisle but reduces the seams in the wheel-well area by not arbitrarily choosing to cut the long piece into equal lengths.
What to do?
I lean toward Plan 1 with no seam down the main aisle and I give a strong nod toward the elegance of Plan 3 being doable using only two of the available pieces. (The back piece is actually slightly longer than drawn so is probably long enough to make up for the height of the wheel wells.)
I might be working on this tomorrow (Saturday). Comments and suggestions welcome.
Here’s the file in OpenOffice/LibreOffice Draw format.


